Installation Instructions for RUGER® 10/22 Carbine
STEP #1. BE POSITIVE THAT YOUR RIFLE IS NOT LOADED
- Treat ALL guns as if they are LOADED.
- NEVER let the muzzle point at anything you are not willing destroy.
- Keep your finger OFF the trigger.
- REMOVE the magazine completely and set it aside.
- PULL the operating rod completely to the REAR and CHECK the chamber.
- Work the bolt handle several times and check the chamber AGAIN.
STEP #2 REMOVE THE REAR SIGHT & BARREL CLAMP
- Loosen the cross-screw in the original barrel band, and take off the barrel band toward the front.
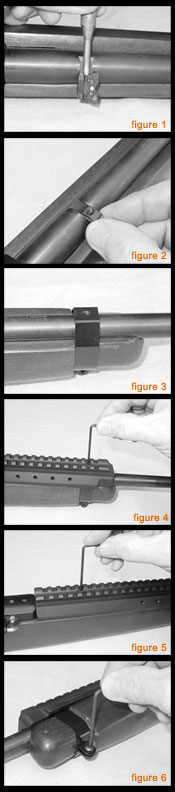
- Place the rifle on its side on a flat and sturdy table or bench surface. Use a towel or pad to protect the stock from scratching. Position a small brass or plastic punch against the base of the rear sight. Use a small hammer to tap the punch and push the rear sight from the dovetail notch in the barrel. (figure 1)
STEP #3 ASSEMBLY
- Slide the new Barrel Clamp over the rifle barrel and the front of the carbine stock to the position where the original barrel band had been. Insert the 8-32 Cap head screw through the flange of the Barrel Clamp and start it into the threaded side of the flange. DO NOT snug this screw down yet! (figure 2)
- Set the rifle upright on the table and slide the Dovetail Nut into the dovetail notch in the barrel where the rear sight had been. (figure 3)
- Set the Mount Body on top of the barrel so that it fits over the Barrel Clamp and the Dovetail Nut.
- Insert the two 8-32 flat-head socket screws through the holes in the top of the Mount Body and start them into the threaded holes in the top of the Barrel Clamp and the Dovetail Nut. DO NOT snug these screws down yet! (figure 4)
- Snug down the top screw holding the Mount Body and Barrel Clamp together, using the hex wrench provided. (figure 5)
- Looking down on the rear of the Mount Body, align it with the sides of the receiver so it is centered over the barrel. Now snug down the screw holding the Mount Body and the Dovetail Nut together. (figure 6)
|
 |
